Friday, 15 February 2019

CS 3 / S88 Contact Track. "Arrival vs Departure" Options.

The original scheme for programing Contact Tracks was the Loco icon, either preceding or following a period like dot with an underline of the loco icon.  With a recent software update that scheme was changed. To my knowledge there was no announcement or explanation of the changes to those of us who own a CS 3 / CS 3 +

Below is a pic of the screen for CT 35.   Click on the loco icon in the "Event" script and the secondary  page will appear.   Note that the loco on the Event script shows the Loco "arriving".   The secondary icon shows the CT ( bar enclosed in an ovoid eclipse) as yellow ( vs gray color). This conforms to the  Loco "arriving" at the CT. 

If one wished to change the CT to a "departure" mode, then merely click on the gray icon and the Loco icon in the Event script will change to a "departure" loco. 

FYI....I finally resolved this issue with the help of the "Marklin Dudes".  


Monday, 11 February 2019

Complicated Shuttle Route From Bahnhof to Kirche Platz.

Hello all....time for a fresh post.

Let's explore some various methods of train control involving signals, contact tracks and circuit tracks on a two way route to and from the Bahnhof  and Kirche Platz.

Objectives:
1) Examine the pros and cons:
          a) Contact tracks
          b) Circuit tracks
          c) Reed contacts.
2) Discuss the complicated "scripts" for this route ...(at least --initially complicated  )


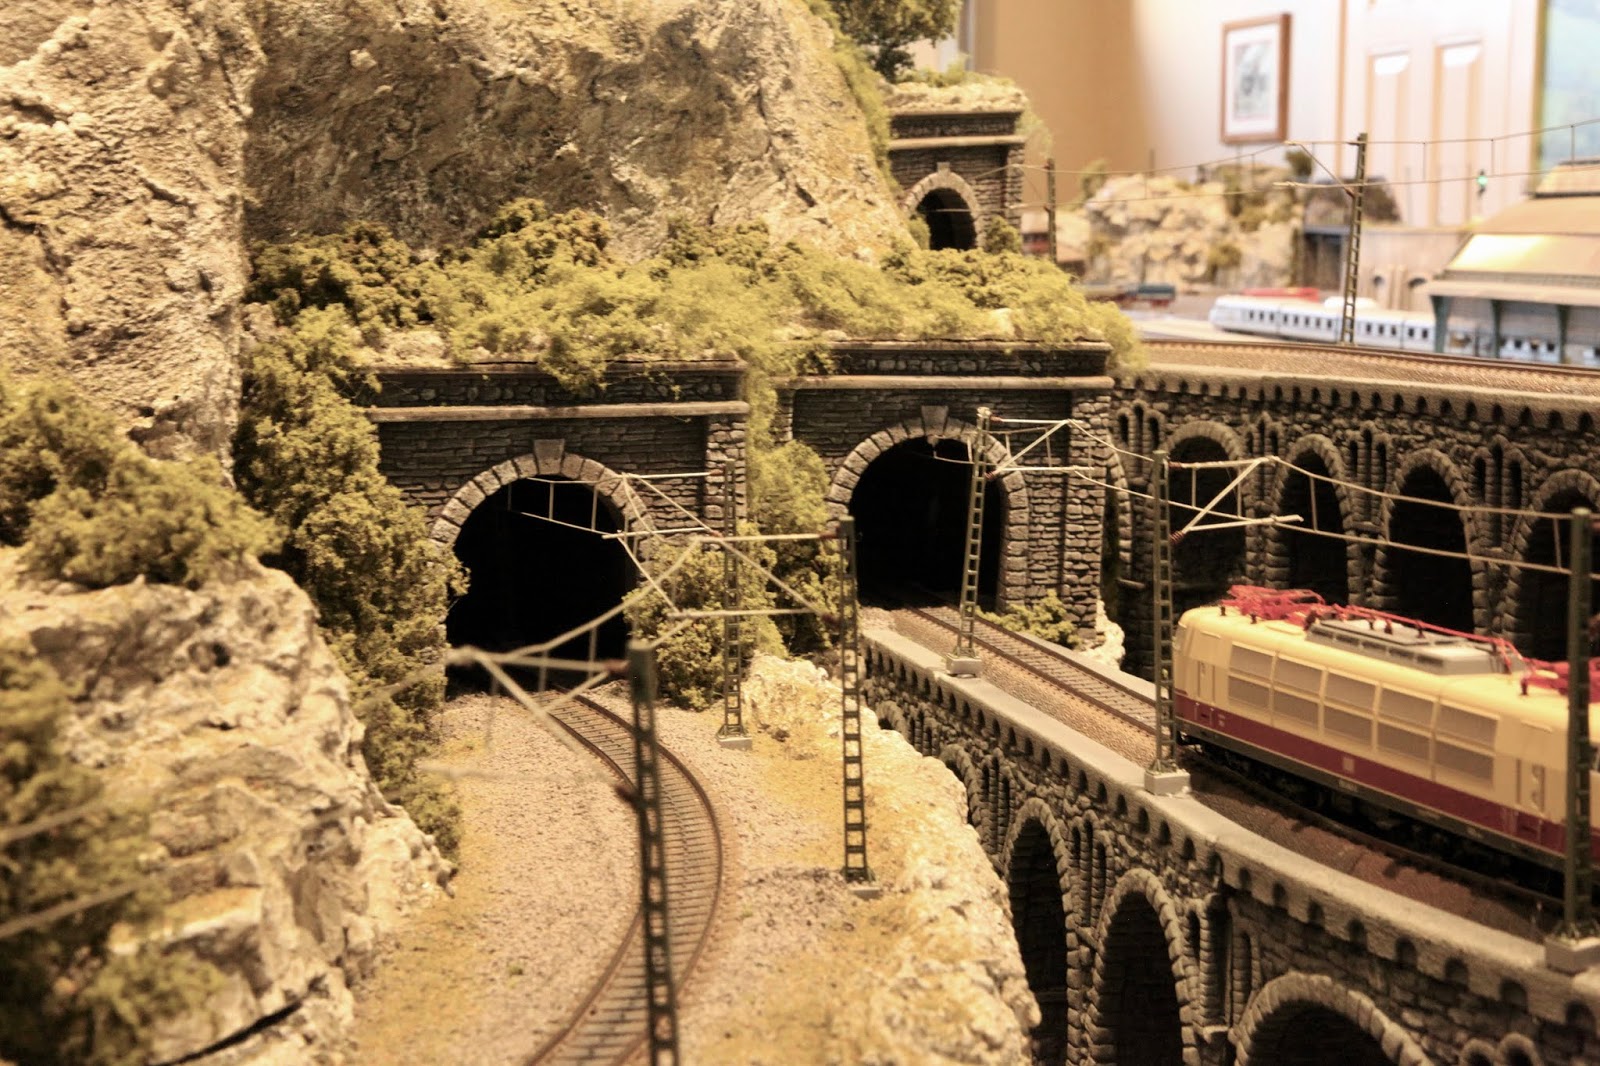
The shuttle route is a point to point traffic pattern between the Bahnhof and the Kirche Platz--outlined in yellow marker. Note that this route crosses the main line which runs clockwise around the Kirche Platz. (Blue track is elevated track descending to the green mainline track)

 A closer view.

Below is shot of the freight lanes, the mainline, and the shuttle route. 
The Shuttle route is the second track from the left. TO 21 ( located to the left of the control tower) merges the mainline and the shuttle route to the Kirche Platz.  The C track has been weathered but not ballasted. Warning....do not ballast the track until the "train control" bugs have been entirely eliminated. 
The Shuttle train emerges from the left, having exited the Bahnhof. 

The Bahnhof, with the Shuttle route on the extreme left of the four lanes.


What I learned: 
1) Contact Tracks:
     - Easy to make with C track. 
     - For one way traffic, one can control "entry" and "exit" scripts. ( The contact track is "downstream" from the signal and the stop track( which precedes the signal)... see multiple Digital Newsletters. 
     - If one uses CT's ( Contact Tracks) for two way traffic be aware that a loco going in either direction will trigger the CT ...ie. the same result via the S88 regardless of the direction of the train! 
     - The CT's are invaluable to show occupancy on a track, because they are NOT MOMENTARY but "constant current" while activated. 
     - CT's can control numerous scripts with the CS2/3 

2) Circuit Tracks:
      - CirT's ( Circuit Tracks) are well suited for two way traffic train control. 
      - Each CirT can control two "functions" ..i.e, activate a signal and close a turnout.
      - Easy to install and connect to the S88. 

3) Reed Contacts: 
      - Seem more difficult to install. ( disclaimer...I have not installed one, but have inspected them) 
      - Require a magnet attached to a loco ( e.g.) to activate. 
      - Instruction pamphlet states that a Reed Contact can only control ONE solenoid. 
      - Reed Contacts are activated in BOTH directions! 

In sum, if one wishes to control traffic in both directions, the best apparent choice would be a circuit track.  

Please note that I certainly am not the final authority on this topic, but after struggling for several weeks to resolve my shuttle route the application below works!

Please refer to this diagram if you wish to follow the route control script by script. 

Below the track diagram is the script sequence if anyone should be interested. 
Signals = Red
Turnouts ( TO) = Black
Contact Track = Solid Green
Circuit Track = Green outline ( each circuit track has two connections to the S88. The numbers are listed for each)    (--> under each circuit track indicates direction of travel activation) 


Bahnhof to Kirche Platz: 

CirT 57      - Sig 6 --> Red ( stops mainline traffic) 
-->              - Shuttle stops at Sig 13 Red ( Sig 13 Red, triggered by descent route to the Bahnhof) 
                   - MANUAL RELEASE--with Signal 13 --> Green with mainline is clear.

CirT 59      - TO 19 --> Red
-->              - Sig 7 --> Green....allows entry into the ascending lane to the Kirche Platz.

CirT 56       - Sig 6 Green  ( releases mainline traffic) 
-->               - Sig 13 --> Red. ( prevents shuttle traffic from approaching the mainline) 

CirT 62        - Sig 7 --> Red. 

CT 42           - TO 19  --> Green
                     - Sig 7 --> Red
                     - TO 21 --> Red  ( makes certain that the mainline traffic remains on mainline)
                     - Sig 4 --> Green ( frees block before block controlled by Sig 6) 
                     - Sig 6 --> Red ( on entry into the next block ) 

Kirche Platz to Bahnhof:

CirT 63         - Sig 6 --> Red ( stops mainline) 
<--

CirT 61          - Sig 13 --> Green
<--                    MANUAL RELEASE OF SIG 7 TO GREEN / MAINLINE TRAFFIC STOPPED
                         ( SIG 7 --.GREEN) 

CT 41             - TO 21 --> Green ( allows entry into the shuttle lane) 

CT 32             - TO 21 --> Red ( after entry to shuttle lane, mainline traffic route open) 

CirT 60           - Sig 6 --> Green  ( releases mainline traffic) 
 <---                 -Sig  7 --> Red 

Cirt 58             -Sig 13 --> Red
<---

Thanks for viewing. I hope there are helpful hints here for some so inclined...and that it keeps the "learning curve" a little less steep.   Be well, blessings....alan 


Wednesday, 26 December 2018

Kirche Platz

It's time for an update on my layout...."life happens" and sometimes one's endeavors are interrupted.

Just finished the Kirche Platz and thought I would share some photos of the process.

The "main line" is the outer loop and with traffic descending clockwise from the 4" elevated tracks.  The inner loop traffic travels counterclockwise terminating at the Kirche Platz. The shuttles run from the Stadt Bahnhof to the Platz.

At a later time we'll find foot traffic access to the Kirche Platz from the busy city area via two bridges yet to be built, and then the hikers can cross over the tunnel and access the Kirche...pink board at 10:00.


The next step was to weather the styrene sheets selected for the base material.....I know...not a cobble stone pattern, but the styrene sheets are very durable and offer a solid foundation.  The weathering process was tedious.    Different processes were tried over several days. Finally a satisfactory result was achieved by using a small cotton cloth dipped in a little black pigment and wiping it gently across the styrene, darkening it a little with each pass.  A total of about 12-15 passes brought out the gray and the black crevasses.


20 Lights were installed without problem.  The red hedges were added as a border, and using Noch "curb"  material, squares were created to support trees...which of course, cannot grow directly out of the stonework.  ;-)


Trees were thus planted on the Rt. side, and another planting area for trees was created at 9:00 near the front of the church.   Pink foam boards still exposed. Weathered the platforms.  Contact tracks in place so that when a train enters one of the terminus lanes, the turnout throws to direct the next train into the adjacent lane. 


Next step: adding the orthopedic gauze over the foam board, followed by sculptomoeld and rock castings 


Sculptomold completed.  Love working with that material. Rock castings included at the "north" end of the module.   People now populating the Kirche Platz....about 200 or so.


Bier garten in full swing...."oompah"  band playing. Lots of people sitting on the benches enjoying the lovely day.


Three lights inside the Cathedral....nice effect.  


Even a light in the tower....


Starting to weather the "north" wall. After several experimental attempts to generate a consistent result, I finally settled on this approach:  Air brush the surface with a dilute gray paint and after it dries,  use several black washes to coat the rock formations and bring out the crevasses and cracks in the rock work.  The final step is then to dry brush with white acrylic to make the stone detail really "pop". ....then have fun adding the greenery. 


Adding the greenery is such a fun exercise.....from the "fine" turf material, etc.


This stanchion is plumb! 


This wedding scene is in honor of our lovely daughter who is happily married with two beautiful children.


Lots of folks watching the wedding couple about to ride in their carriage....


The chapel....accessible by trail from the city....with a view of the mountains. 


Happy with the ballasting and weathering of the C track.

 Don't forget railings ....people can walk around the "old city" wall...


Hope you enjoyed this little journey....I think I'll rest against the railing and wait here to watch the next train pass......Auf Wiedersehen...  Just added two shots of the Chapel....amazing the changes when adding more greenery, fencing and people !


Thursday, 30 August 2018

The Mountain / Water Falls Complete !

The Mountain and water falls are now complete.  Let's examine the  technique I employed which seems to be a bit of a hybrid including several different approaches.

The cliff area is comprised mostly of Sculptomold ( SCM) and smaller rock casting along the face. The two ledges near the bottom of the cliff are horizontal hot glued cardboard pieces covered with Sculptomold.  The stream bed is "leak proof" with plaster gauze covering pink foam board, and then  SCM used to build the landscape including the stream bed.


The Steam bed is colored with a green / blue mixture of pigments ( craft store) and then a little black wash to darken the base. Sorry about the tint of the pic...2700K lighting...


Recall that the season is late spring or early summer. The spring snow melt and "run off" are over and  now there is only a minimal gradual snow melt coming from the mountain, so one would not expect heavy water falls this time of year, only a gentle "bathing" of the cliff face with gentle, transparent sheets of soft and slow flowing water.   Further the color of the water during "run off" is more turquoise, but now it is more greenish blue.

Below are the "holding pools" just beneath the melting snow pack.

Note now that there are numerous small rocks sand which have washed into the outflow from the melting snow and from the spring run off.


Lower pool. The water from the upper pool softly flows over the slight rocky drop off into the lower pool, coating the rock face with a sheen of slowly flowing water.   Again note the abundant small rocks.  ( the rocks, and sand like debris were made from old rock castings which were placed in an old towel and beaten to smithereens with a hammer....then dyed with gray pigment ....don't forget to save "everything"..even the smallest bit if debris)


Upper pool.


Top of cliff face with two "drops" above the cliff.


Now pouring Woodland Scenics Realistic Water.  Drizzled down the face of the cliff into the base stream bed, starting to cover some of the stream bed rocks.


Lower part of steam ....


Note the "sheerness"--almost translucent ....nature of the sheets of gently flowing water.  Achieved with WS "Water Effects" paste,-- placed in strips of varying width and length on a glass pane and then " messaged" laterally and length wise to create a very thin, almost transparent sheet of water.   Best to allow the material to dry a lot longer than recommended ( 24 hrs) ..but better after 72 hrs. Dry brush with a light coating of white acrylic and "glue" in place with the Water Effects.


Interesting affect....illusion of very soft and minimal water falls.


Another view.


Lower stream. Note the more turbulent water around the boulder.  Created with Water Effects and brushed  / dabbed gently  on the surface, then white dry brushed.  Cute little "eddy line" downstream from the boulder.....
Ripples are achieved on the glossy hard "water surface" by dabbing GLOSSY Modpodge on the surface and "blowing" it around with an air brush ..empty of course. ...allow to dry....

End result.... quite a challenge but worth all the time invested.  Added lots of greenery to soften the scene....always lots of bushes growing next to water source and smaller trees as well. 


Thank you for viewing. ....blessings...

Saturday, 18 August 2018

Helix Mountain nearing completion.

Hello, friends.

I've been working on scenery on the mountain for the last couple of days and thought I would update some photos.

This pic shows the added base of the mountain with a planned water fall on the Lt, and a catch basin below,  with an egress of small stream from Lt to Rt.  The amount of snow on the mountain would dictate that the water fall actually be small rivulets gently cascading down the face of the mountain, and not an outright "water fall" of high volume.


The Sculptomold was stained with "stone gray" and black leopard spotting technique with a charcoal mix as the last coat.  I thought the end result was a bit too "bright" so the trusty air brush was summoned for acton to tone down the rock faces.   Note that the base of the bench work was painted black. After the stains dried, white brush finish applied to bring out all the intricate rock detail of the Sculptomold.


Another view.  Hard to believe that a 2.5 turn helix lies beneath all this nylon mesh and plaster / Sculptomold.  The small stream exits the layout on the lower rt. Now we need to add greenery.


This is the ledge made initially of hot glued cardboard....finished well. The water fall rivulets will cascade onto these ledges.  Stream bed below.


Train ascending helix to the main part of the layout.  Greenery added.   I also added "moss" type vegetation to the faces.  Technique:  with a small paint brush apply dilute white glue or Mod Podge to a limited section of the mountain wall face, then "blow" a fine mist of WS "blended turf". ...I changed my technique a little. It's easier to place a little of the turf material in a small spoon and gently blow it onto the prepared rock face.  Seems to work well.  It softens the starkness of the rock faces.


Another view.


Added greenery around tunnel entrances....color not ideal...caused by 2800k lighting.


Train descending...


More later as the "water fall" develops. Thanks for viewing.....blessings...alan